


The Grandstream GXW4200 series FXS gateways offer from 16 up to 48 FXS ports. All of the ports can be serviced by a single T38Fax trunk at once, or you can use some of the ports for your fax and some to provide standard voice service through a PBX.
Overview
In some deployment scenarios, it may be desirable to consolidate a group of DID's under a single SIP registration. This allows you to not only consolidate your DID's, but the way in which those DID's are billed as well. With this method, you have the flexibility to route/assign DIDs as your deployment may require, while taking advantage of additional cost savings in the process.
We've outlined this sort of scenario in this configuration guide for the Grandstream GXW4200 FXS Analog gateways. (GXW4216/GXW4224/GXW4232/GXW4248) As always, should you have any trouble with this configuration guide or need any other assistance, be sure to open a ticket and one of our Engineers will be happy to help you resolve any issues you may be having.
Configuring the Grandstream GXW4200 for DID Routing
Models: GXW4216, GXW4224, GXW4232, GXW4248
Before you begin, ensure that your device is on the latest firmware release. Firmware Version 1.0.5.16 or higher is required. This guide assumes that you have configured the device's network settings as required by your network topology.
(NOTE: The T38Fax support team will need to enable a feature on your Power-T.38 account to support this method of routing. Contact us by email or ticket to request this feature be enabled on your account.)
1. Select "Profile 1 -> General Settings" and configure the following option:
Profile Active: Yes
SIP Server: sip.t38fax.com:5080
Save & Apply your settings, and then move on to step 2. See the screenshot below for reference.

2. Navigate to "Profile 1 -> SIP Settings -> Basic Settings" Configure the following options in that menu:
Register Expiration: 5
Local SIP Port: 5080
Enable SIP OPTIONS/NOTIFY Keep Alive: OPTIONS
Use Request Routing ID in the SIP Headers: Yes.
Navigate to "Profile 1 -> SIP Settings -> Security Settings" and change the following setting:
Accept Incoming SIP from Proxy Only: Yes.

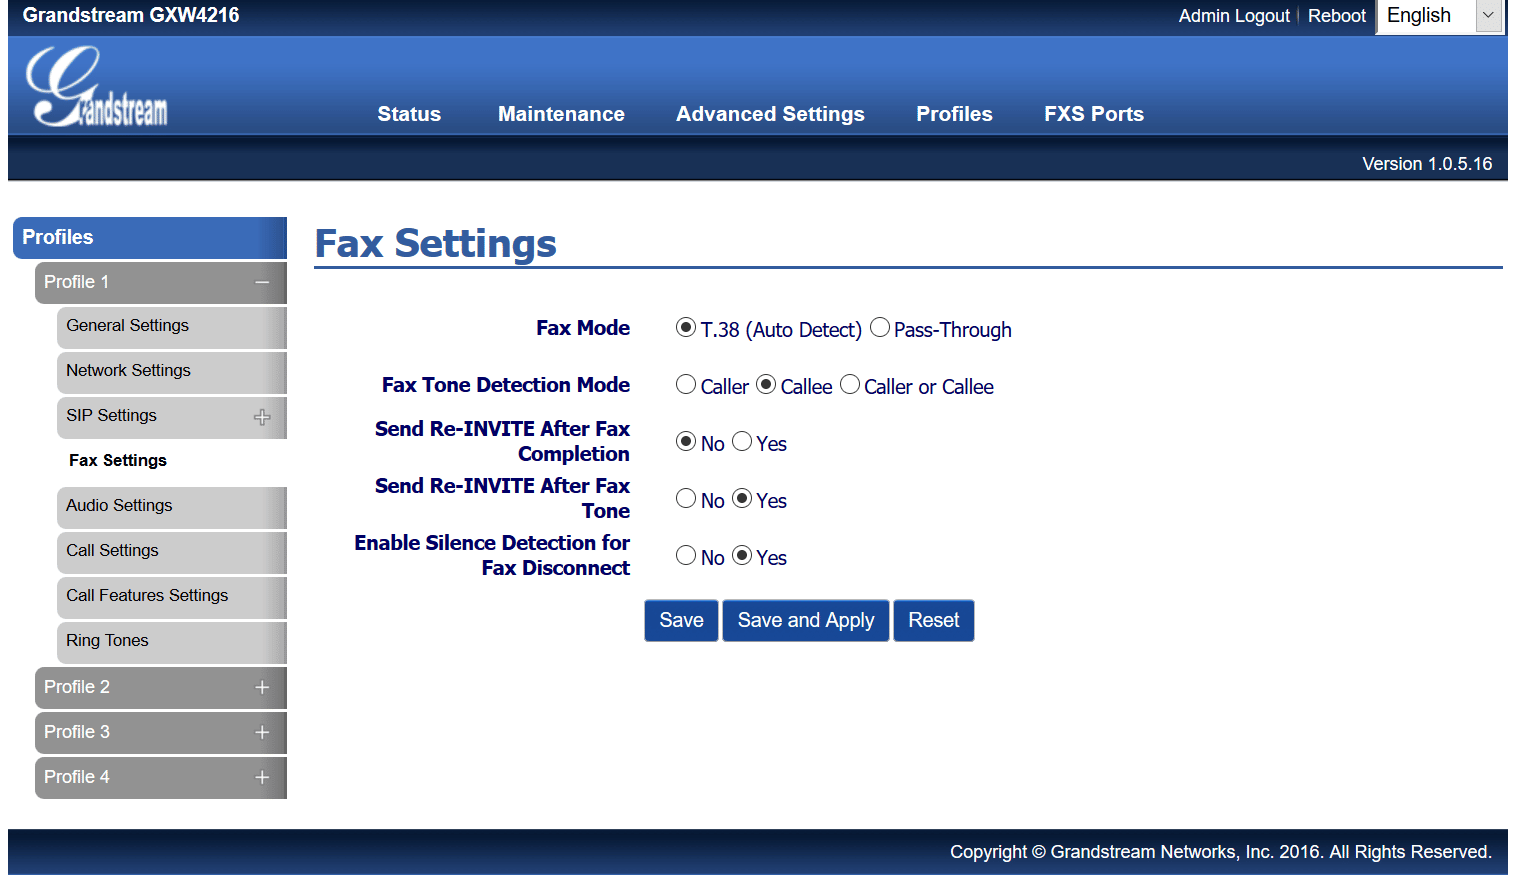
Navigate to "Profile 1 -> Fax Settings" to to ensure the following options specific to fax:
Fax Mode: <T.38 (Auto Detect)
Fax Tone Detection Mode: Callee
Send Re-INVITE after Fax Tone: Yes
Navigate to "Profile 1 -> Audio Settings" to enable a few more fax optimization settings at the bottom of the page. Set the following:
Jitter Buffer Type: Fixed
Jitter Buffer Length: High
Disable Line Echo Canceller: Yes

3. Next, under "Profile 1 -> Call Settings" set the following options:
Disable Call Waiting: Yes
Disable Call Waiting Caller ID: Yes
Disable Call Waiting Tone: Yes

4. Now that our device has been configured properly, add the associated account details. For the purposes of this guide, we'll be using the following DIDs to demonstrate how this will work:
18043027000 (Primary DID, used for SIP Registration)
18043027001 (Alias assigned to primary DID)
18043027002 (Alias assigned to primary DID)
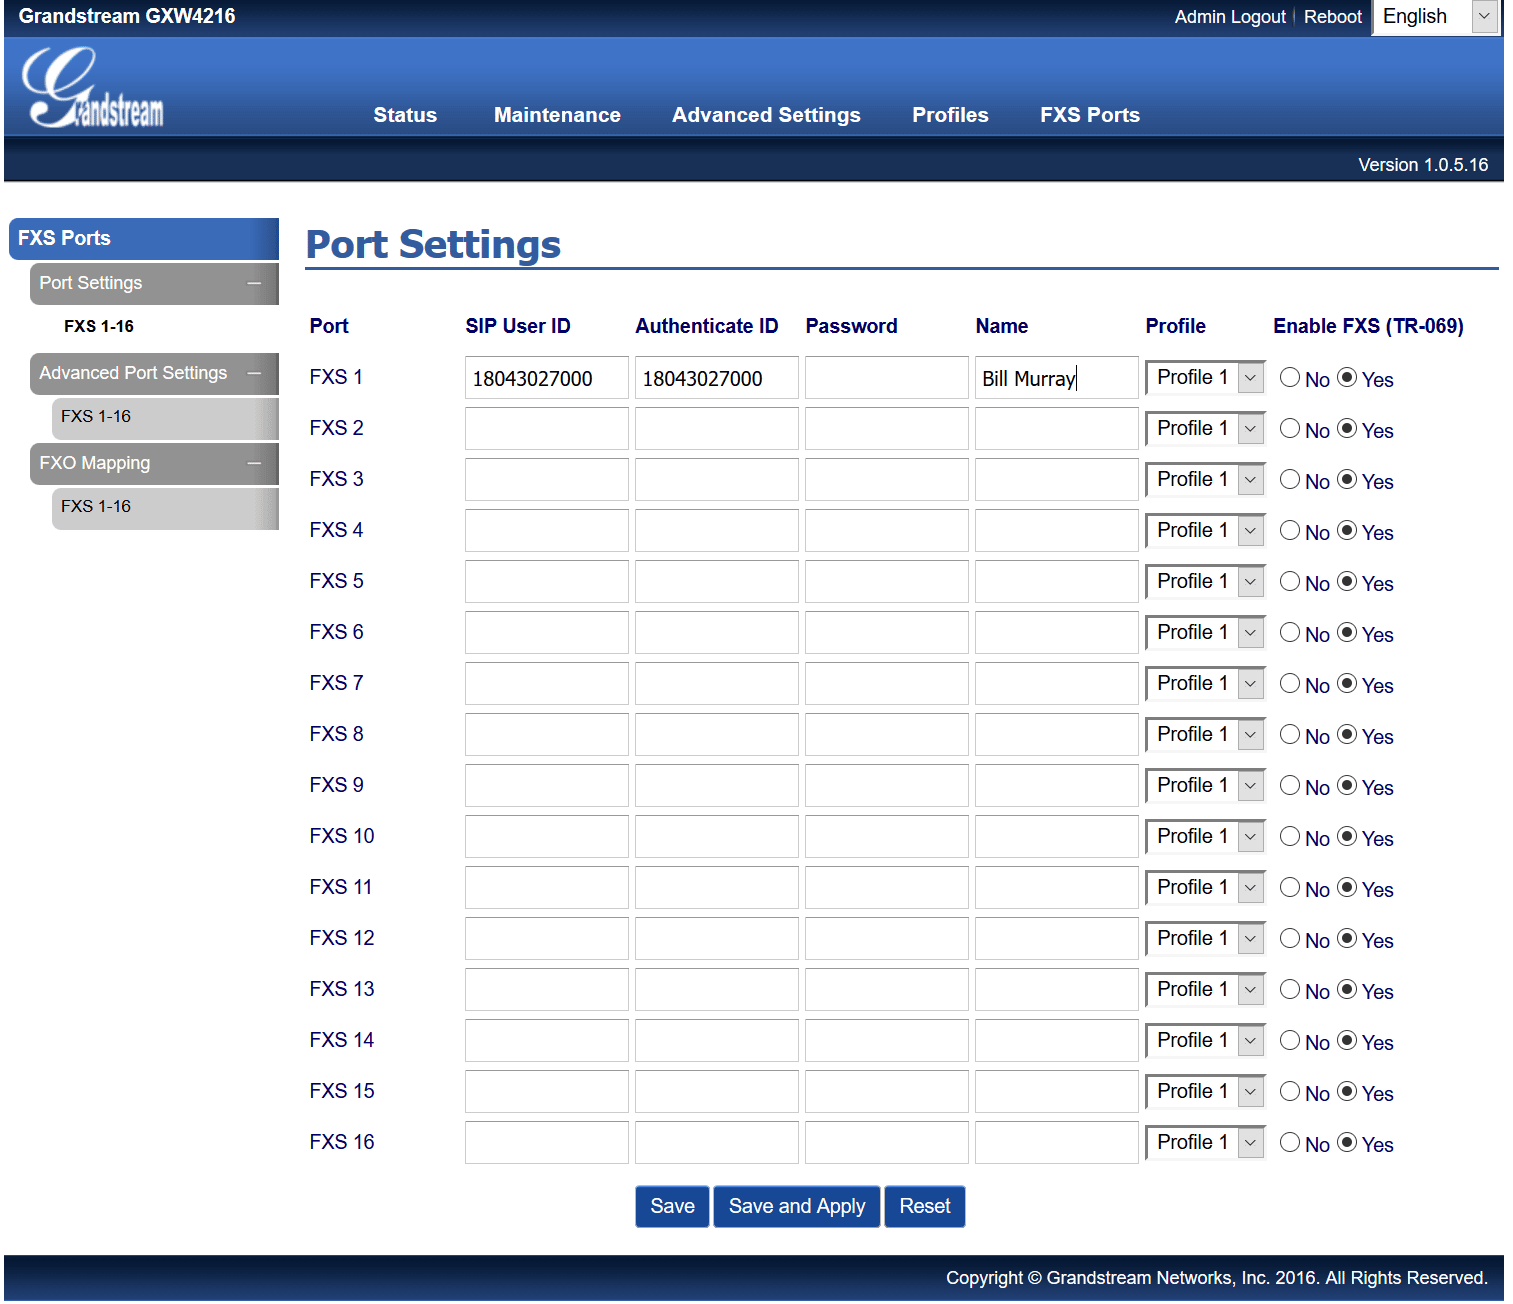
Navigate to "FXS Ports -> Port Settings" to input our account details and register this account to one of the FXS ports. (We used FXS1 in this example).
Under "SIP User ID", enter your primary DID.
Also enter your primary DID under "Authenticate ID"
Input your SIP Account Password in the "Password" field. (Note: This is not the same as your my.t38fax.com credentials!)
Give it a name and assign it to the Profile you used above. (We used Profile 1 in this example.)
Save & Apply settings. See below for an example.
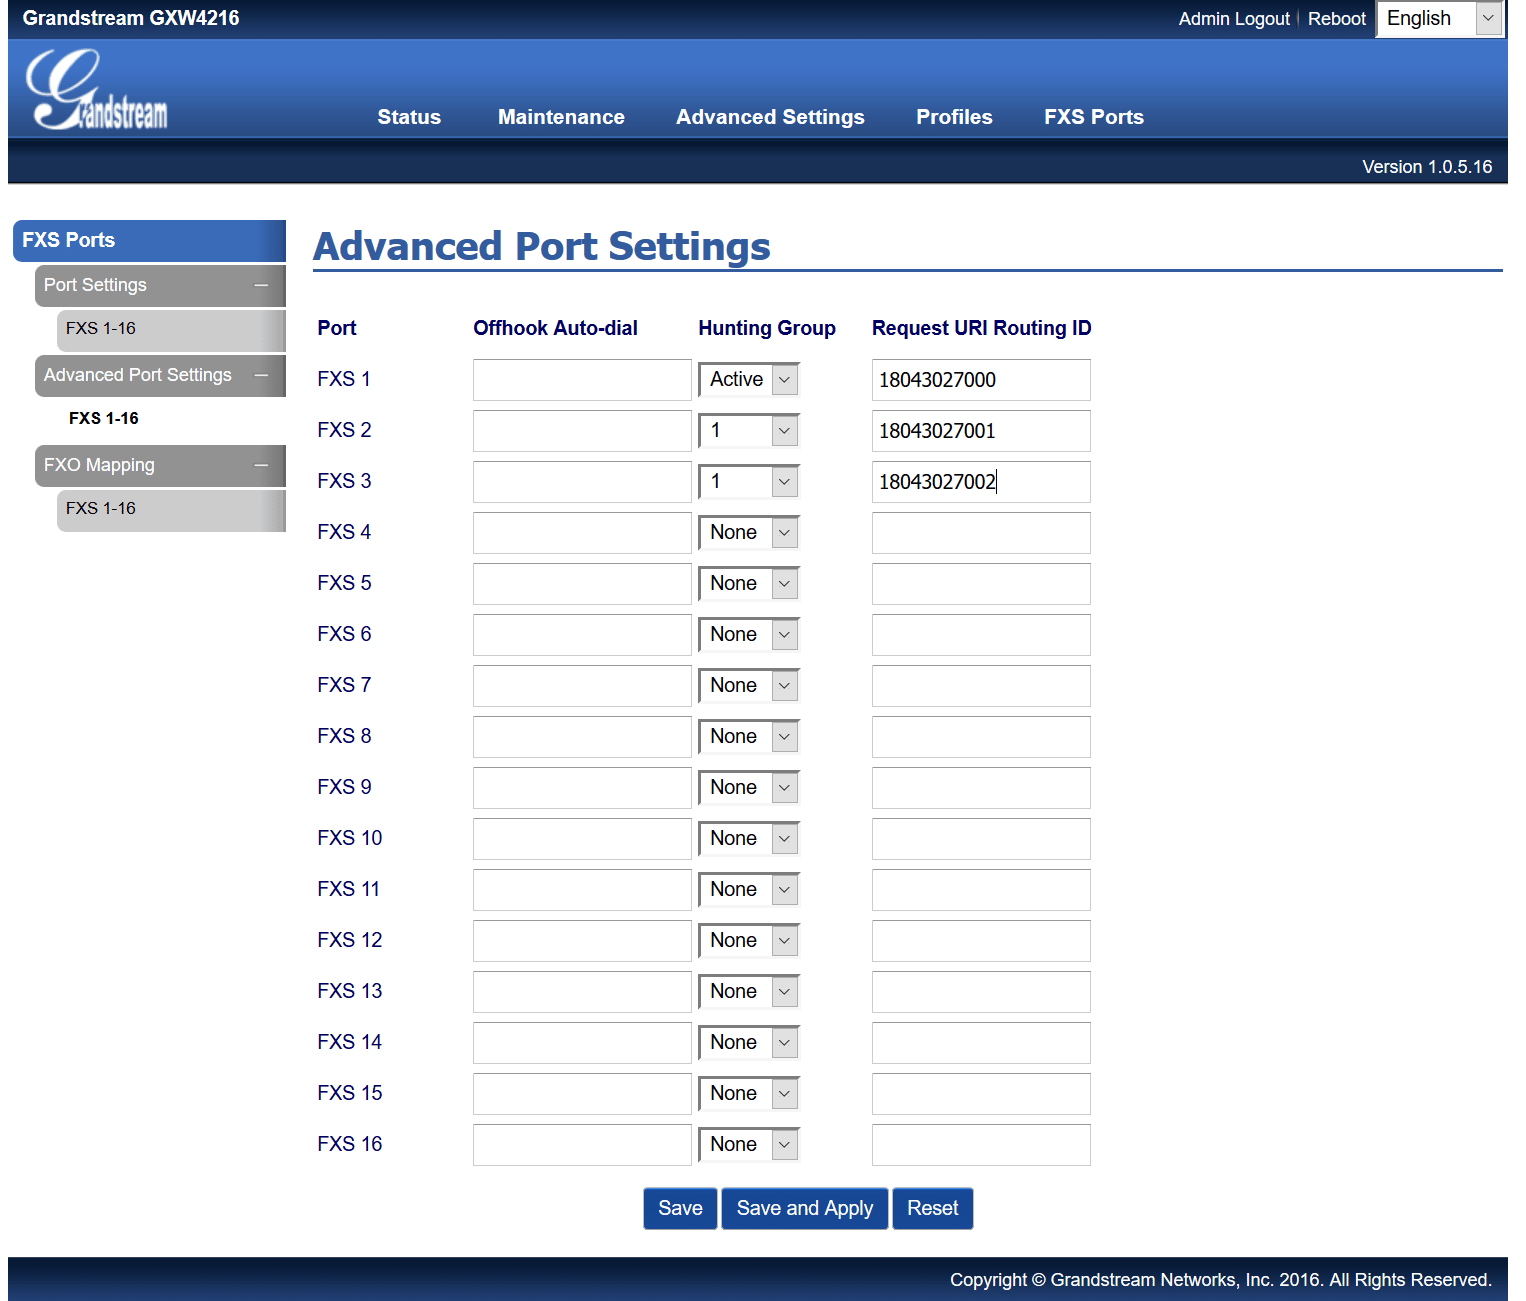
5. Finally, navigate to "FXS Ports - Advanced Settings" and see below for an overview on configuring this area:
First, add the primary DID to the associated FXS Port (In this case FXS1) in the "Request URI Routing ID" field.
Set FXS1's "Hunting Group" to "Active"
Add each additional DID to it's own port, putting the full 11 digit DID in the "Request URI Routing ID" field.
For each additional DID, set the "Hunting Group" to "1" (The port of the active registration.)
See the screenshot below for an example:
Finally, contact the T38Fax support team to enable support for this method of routing on your Power-T.38 account. As always, if you have any trouble our Engineers are always willing to help you work through any problem with your service!
