

FusionPBX
A highly scalable, multi-threaded, multi-platform communication platform
FusionPBX can be used as a highly available single or domain based multi-tenant PBX, carrier grade switch, call center server, fax server, voip server, voicemail server, conference server, voice application server, appliance framework and more. FreeSWITCH™ is a highly scalable, multi-threaded, multi-platform communication platform.
Visit FusionPBX's Website: FusionPBX
Official FusionPBX GitHub: FusionPBX on GitHub
Visit FreeSWITCH's Website: FreeSWITCH
- add_circle FusionPBX Version 4.2.1 (click to expand article)
This version supports both T.38 Passthrough and T.38 Termination.
- T.38 Passthrough:
1. Sign up for a Free Trial account here: Free Trial Signup
2. Create a new Gateway to connect your T38Fax.com SIP Trunk to FusionPBX. To create a new Gateway, use the top menu to navigate to: "Accounts -> Gateways" and then click a "+" to create a new Gateway.
Configure the following settings when creating a new Gateway to connect to your T38Fax.com SIP Trunk:
Configuration Option Required Value Gateway : T38Fax Username : SIP_USERNAME help Password : SIP_PASSWORD help From Domain : sip.t38fax.com Proxy : sip.t38fax.com:5080 Realm : sip.t38fax.com Expire Seconds : 300 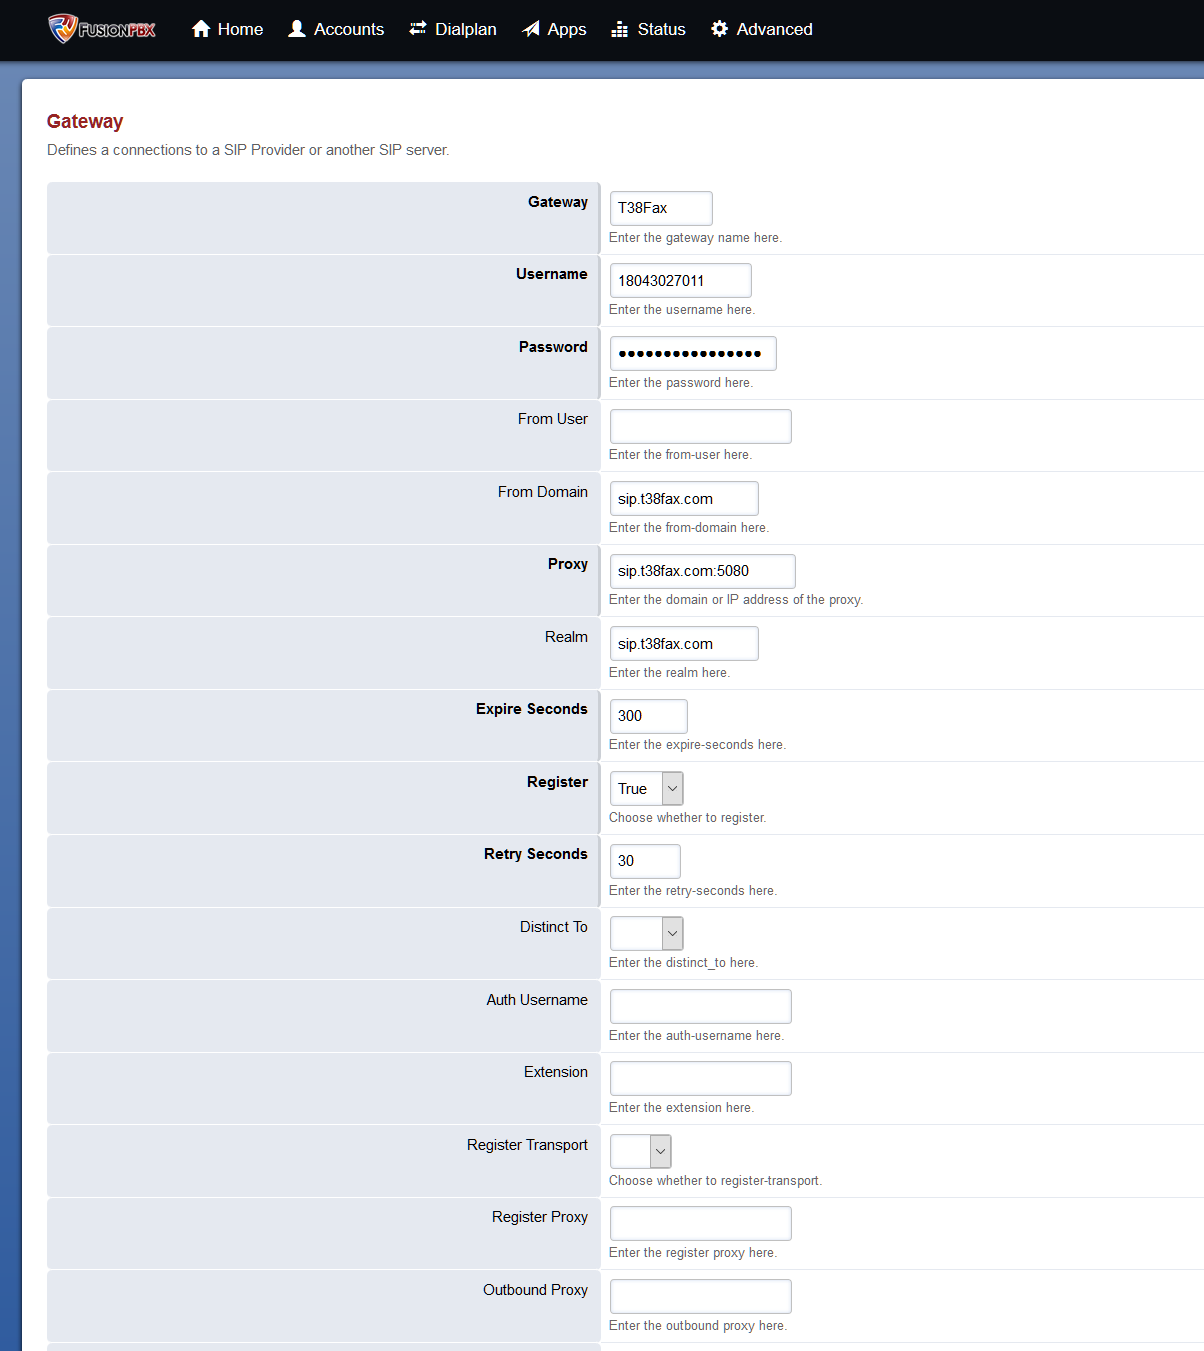
FusionPBX Gateway Configuration: Basic - T38Fax.com The following options are found after clicking the "Advanced" button under the trunk creation screen.
Configuration Option Required Value Caller ID in From : True SIP CID Type : rpid 
FusionPBX Gateway Configuration: Advanced - T38Fax.com 3. Create an extension to connect your ATA to your FusionPBX system. Minimal configuration is fine, take note of the Extension and Password fields, as you'll need them to register your ATA to your FusionPBX. If available, be sure to configure your ATA according to the appropriate guide for its make and model. You can find a list of all of our configuration guides here: Full List of Configuration Articles
You can create an extension by going to "Accounts -> Extensions" and clicking the "+". Enter an extension number in the "Extension" box and hit "Save". The "Password" box will appear, including an automatically generated password. Using these credentials, register your ATA to FusionPBX:
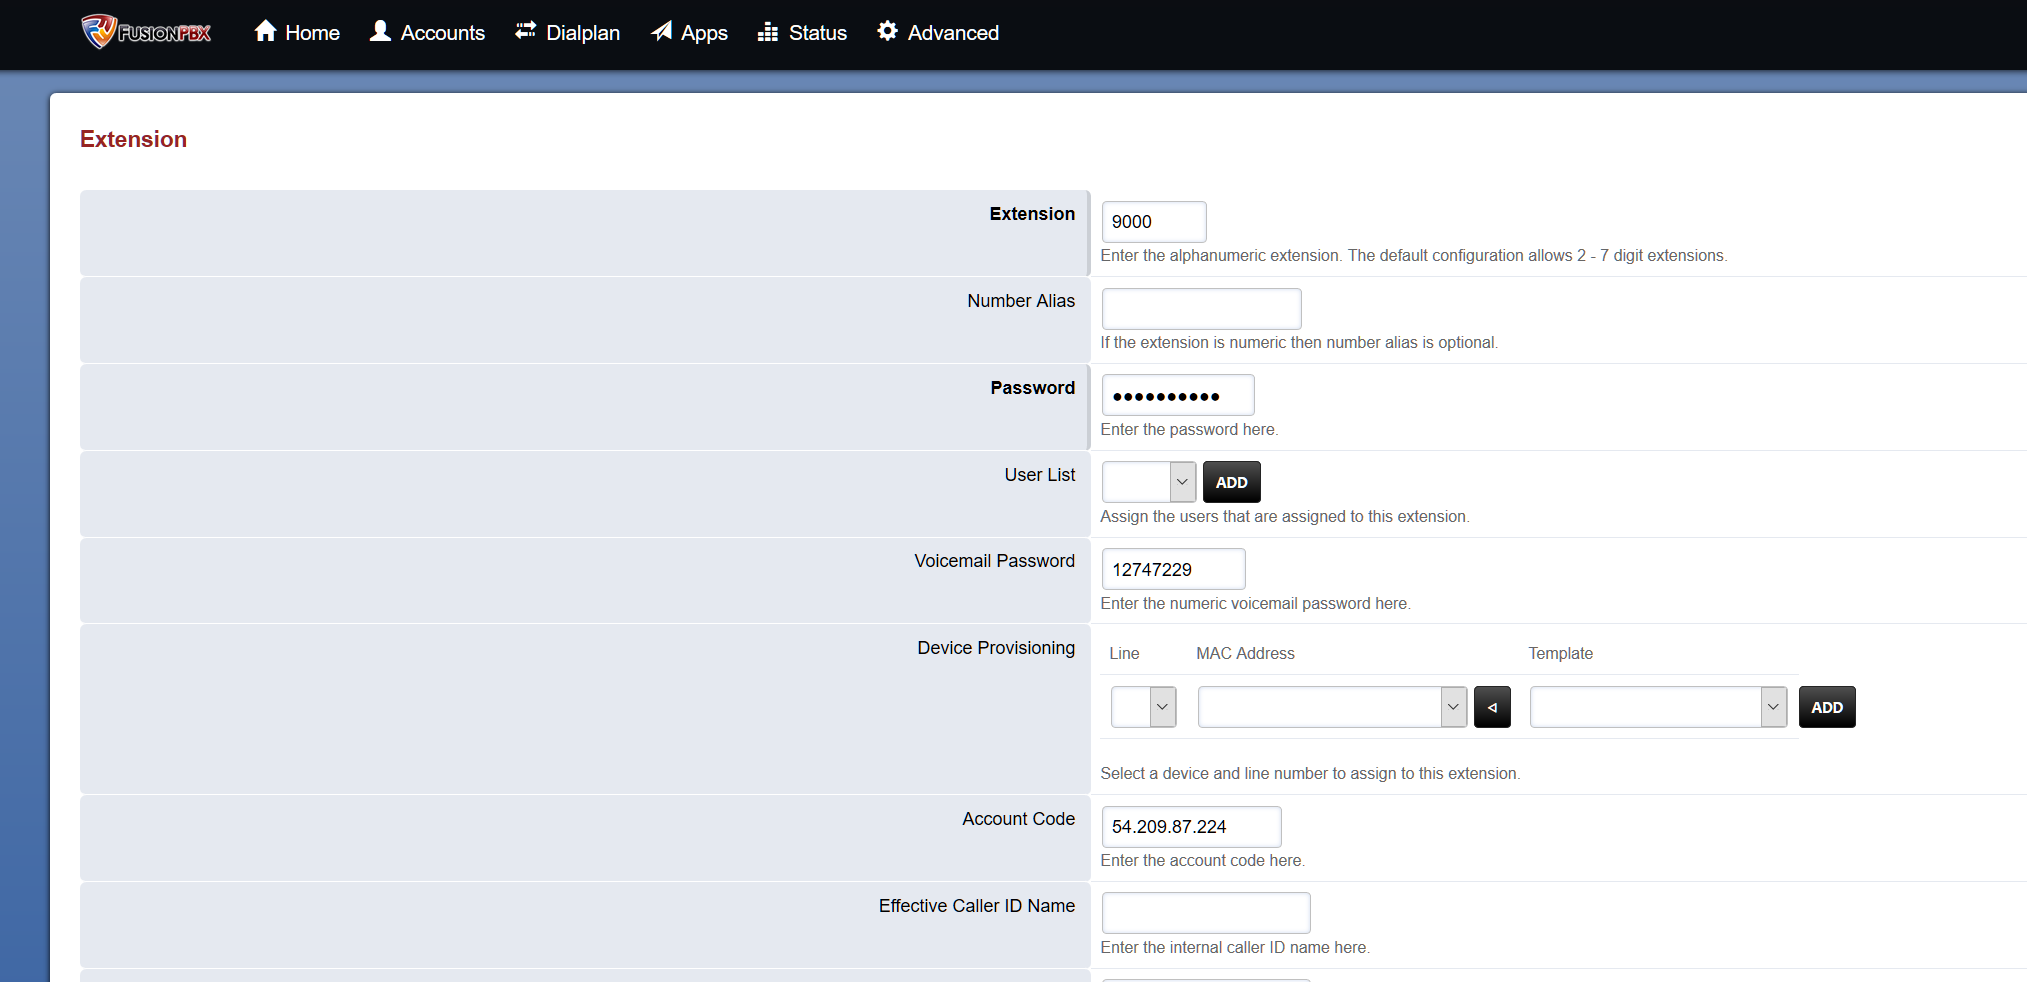
Additionally, set Voicemail Enable to False on this screen:

4. Create a new "Destination" to automatically create an inbound route to your new extension. Navigate to: "Dialplan -> Destinations" and click a "+" symbol to create a new Destination (and inbound route).
Configure the following settings when creating a new Destination:
Configuration Option Required Value Type : Inbound Destination : SIP_USERNAME/DID Action : Set this to the extension you created above. 
FusionPBX Destinations - T38Fax.com 5. Now we will need to add a few parameters to the Inbound Route to ensure that T.38 is accepted on all legs of the call. For each inbound route you've created, you'll need to add these parameters to ensure that it will function properly. Navigate to "Dialplan -> Inbound Routes" and select the Inbound route that was automatically created during step 4. You will need to adjust the "Order" field of the "Transfer" action to ensure that it is the last line in the dialplan. Add the following parameters to the dialplan, be sure to review the screenshot for more detail:
Tag Type Data Action Export fax_enable_t38=true Action Export fax_enable_t38_request=true Action Export t38_passthru=true Action Export fax_use_ecm=true Action Export absolute_codec_string=PCMU 
FusionPBX Inbound Route Dialplan - T38Fax.com 6. Next, we'll configure our "Outbound Routes" so that you can send calls out via your T38Fax.com trunk. Using the top menu, navigate to "Dialplan -> Outbound Routes" and click a "+" symbol to create a new Outbound Route.
Configure the following settings when creating your Outbound Routes:
Configuration Option Required Value Gateway : Select "T38Fax" Dialplan Expression : ^(?:[+]?1)?([2-9]\d{9})$
FusionPBX Outbound Routes Wizard - T38Fax.com 7. As with inbound routing, we will need to add a few T.38-specific parameters to the Outbound Route. Navigate to "Dialplan -> Outbound Routes" and select the outbound route from step 6. As before, the Order field is important to note. Change the parameters from the first table (changes bolded), and add the parameters from the second:
Change Parameters
Tag Type Data Action Set inherit_codec=false Action Set callee_id_number=1$1 Action Set continue_on_fail=false Action Bridge sofia/gateway/T38Fax/1$1 Add Parameters
Tag Type Data Action Export fax_enable_t38=true Action Export fax_enable_t38_request=false Action Export t38_passthru=true Action Export fax_use_ecm=true Action Export absolute_codec_string=PCMU 
FusionPBX Outbound Route Dialplan - T38Fax.com At this time, you should be able to successfully send a fax using T.38 pass-thru to your ATA. Feel free to test by sending a single page fax to: 215-825-8792, and the system will fax your transmission back to you once it's successfully received it.
- T.38 Termination (Fax Server):
T.38 Termination:
To integrate T38fax.com with FusionPBX so that FusionPBX itself is able to receive and send faxes directly, follow the steps below.
1. Sign up for a Free Trial account here: Free Trial Signup
2. Create a new Gateway to connect your T38Fax.com SIP Trunk to FusionPBX. To create a new Gateway, use the top menu to navigate to: "Accounts -> Gateways" and then click a "+" to create a new Gateway.
Configure the following settings when creating a new Gateway to connect to your T38Fax.com SIP Trunk:
Configuration Option Required Value Gateway : T38Fax Username : SIP_USERNAME help Password : SIP_PASSWORD help From Domain : sip.t38fax.com Proxy : sip.t38fax.com:5080 Realm : sip.t38fax.com Expire Seconds : 300 FusionPBX Gateway Configuration: Basic - T38Fax.com The following options are found after clicking the "Advanced" button under the trunk creation screen.
Configuration Option Required Value Caller ID in From : True SIP CID Type : rpid FusionPBX Gateway Configuration: Advanced - T38Fax.com 3. Create the Fax Server. Navigate to "Apps -> Fax Server" and click a "+" symbol to create a new Fax Server.
Configure the following settings when creating a new Fax Server Application:
Configuration Option Required Value Name : Unique Fax Server Name Extension : Desired Extension Number Caller ID Name : Desired Caller ID Name Caller ID Number : Desired Caller ID Number Email Address : john.doe@example.com 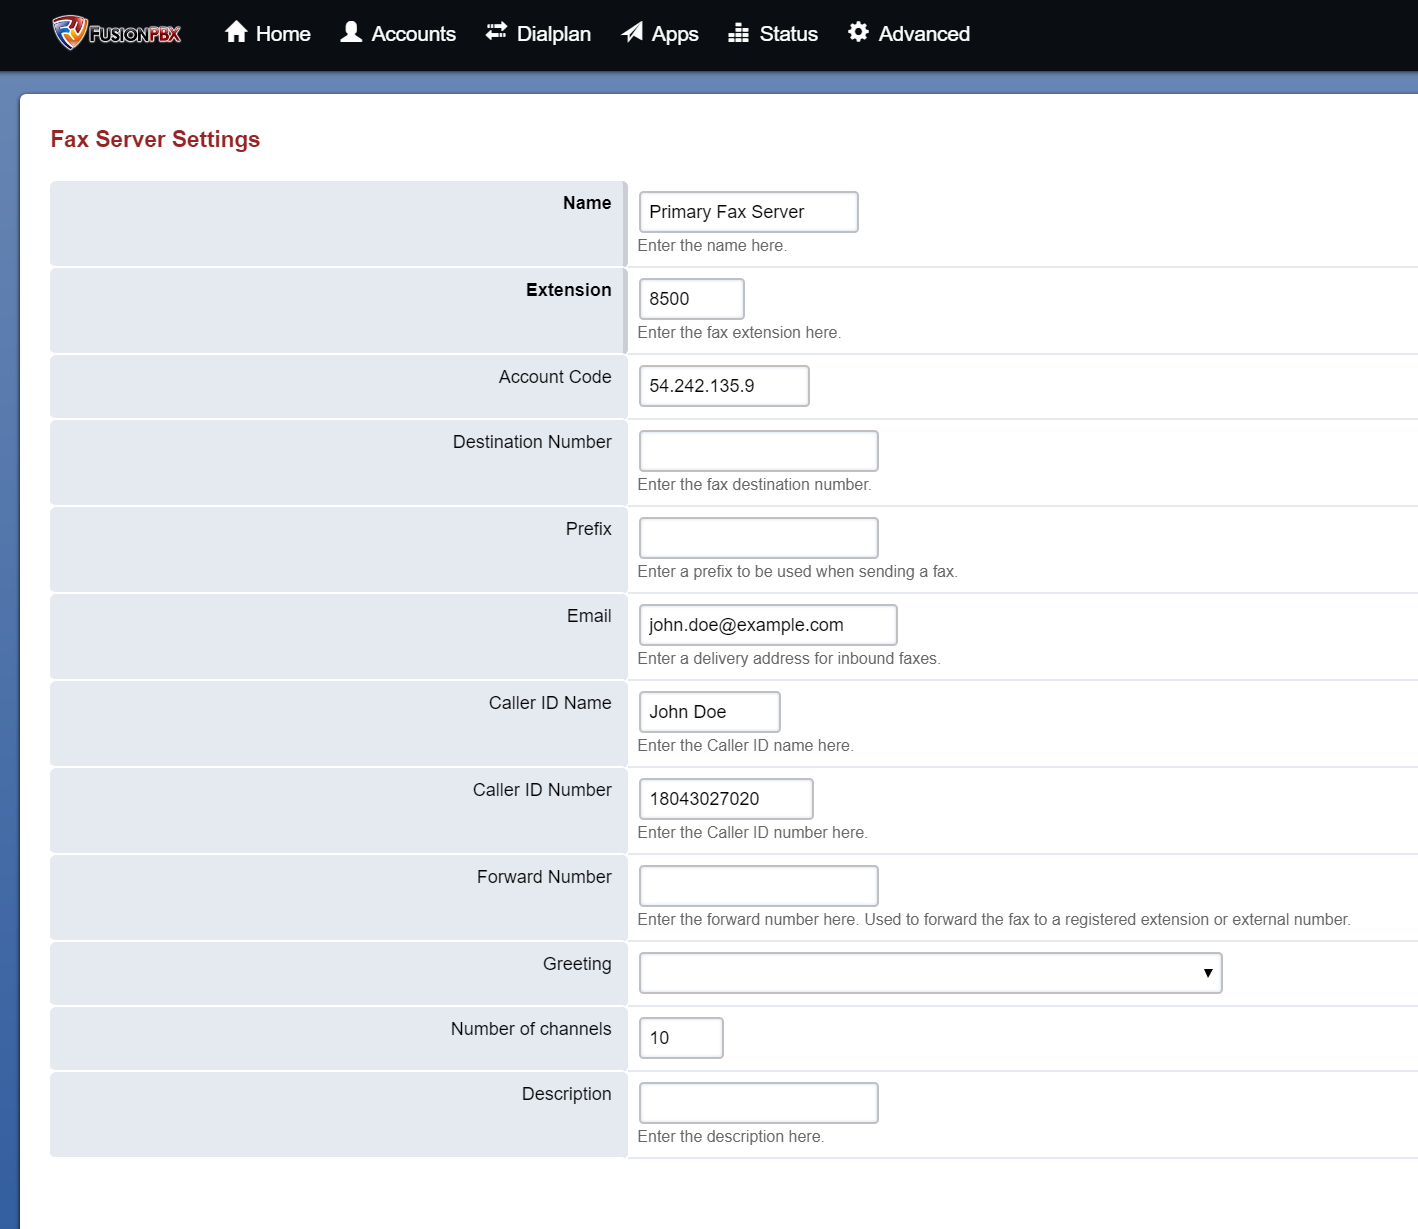
FusionPBX Fax Server Configuration - T38Fax.com Additionally, you'll need to make an adjustment in the Fax Server dialplan. Navigate to "Dialplan -> Dialplan Manager" and then select the associated dialplan. (Named according to the name you configured above.) Make the following adjustments:
Configuration Option Required Value fax_enable_t38_request : True 
FusionPBX Fax Server Dialplan - T38Fax.com 4. Create a new "Destination" to automatically create an inbound route to your new Fax Server application. Navigate to: "Dialplan -> Destinations" and click a "+" symbol to create a new Destination (and inbound route).
Configure the following settings when creating a new Destination:
Configuration Option Required Value Type : Inbound Destination : SIP_USERNAME/DID Action : Set this to the Extension of the Fax Server 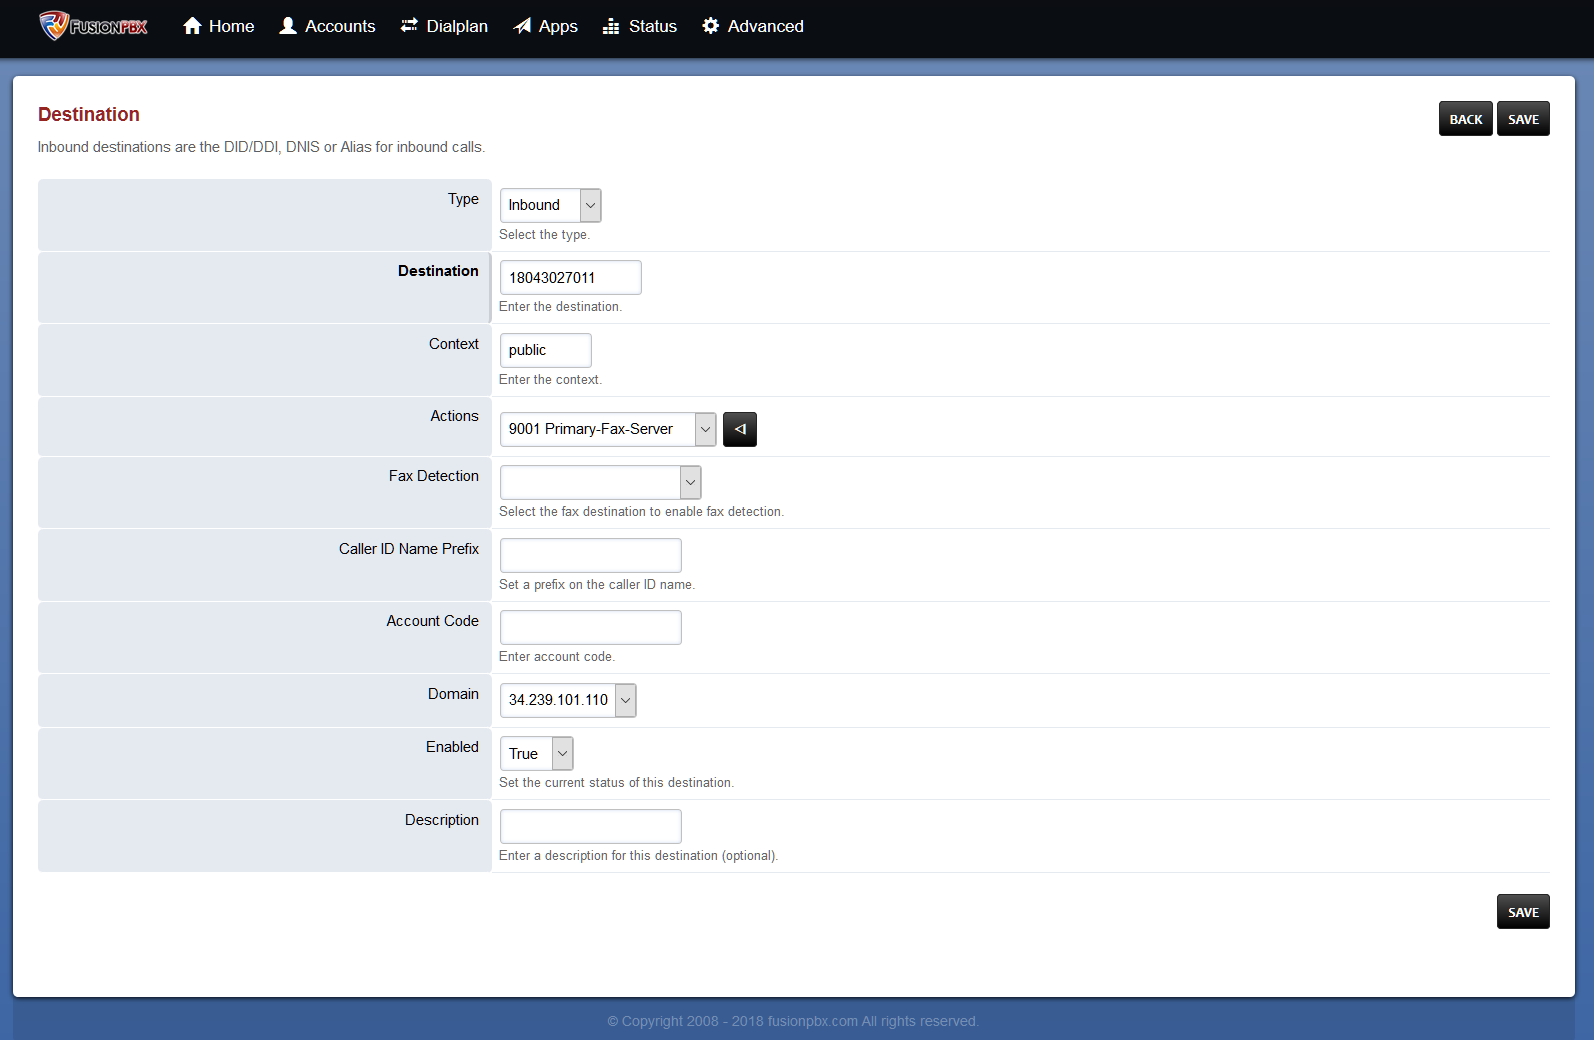
FusionPBX Destinations - T38Fax.com 5. Now we will need to add a few parameters to the Inbound Route to ensure that T.38 is accepted on all legs of the call. For each inbound route you've created, you'll need to add these parameters to ensure that it will function properly. Navigate to "Dialplan -> Inbound Routes" and select the Inbound route that was automatically created during step 4. You will need to adjust the "Order" field of the "Transfer" action to ensure that it is the last line in the dialplan. Add the following parameters to the dialplan, be sure to review the screenshot for more detail:
Tag Type Data Action Export fax_enable_t38=true Action Export fax_enable_t38_request=true Action Export t38_passthru=true Action Export fax_use_ecm=true Action Export absolute_codec_string=PCMU 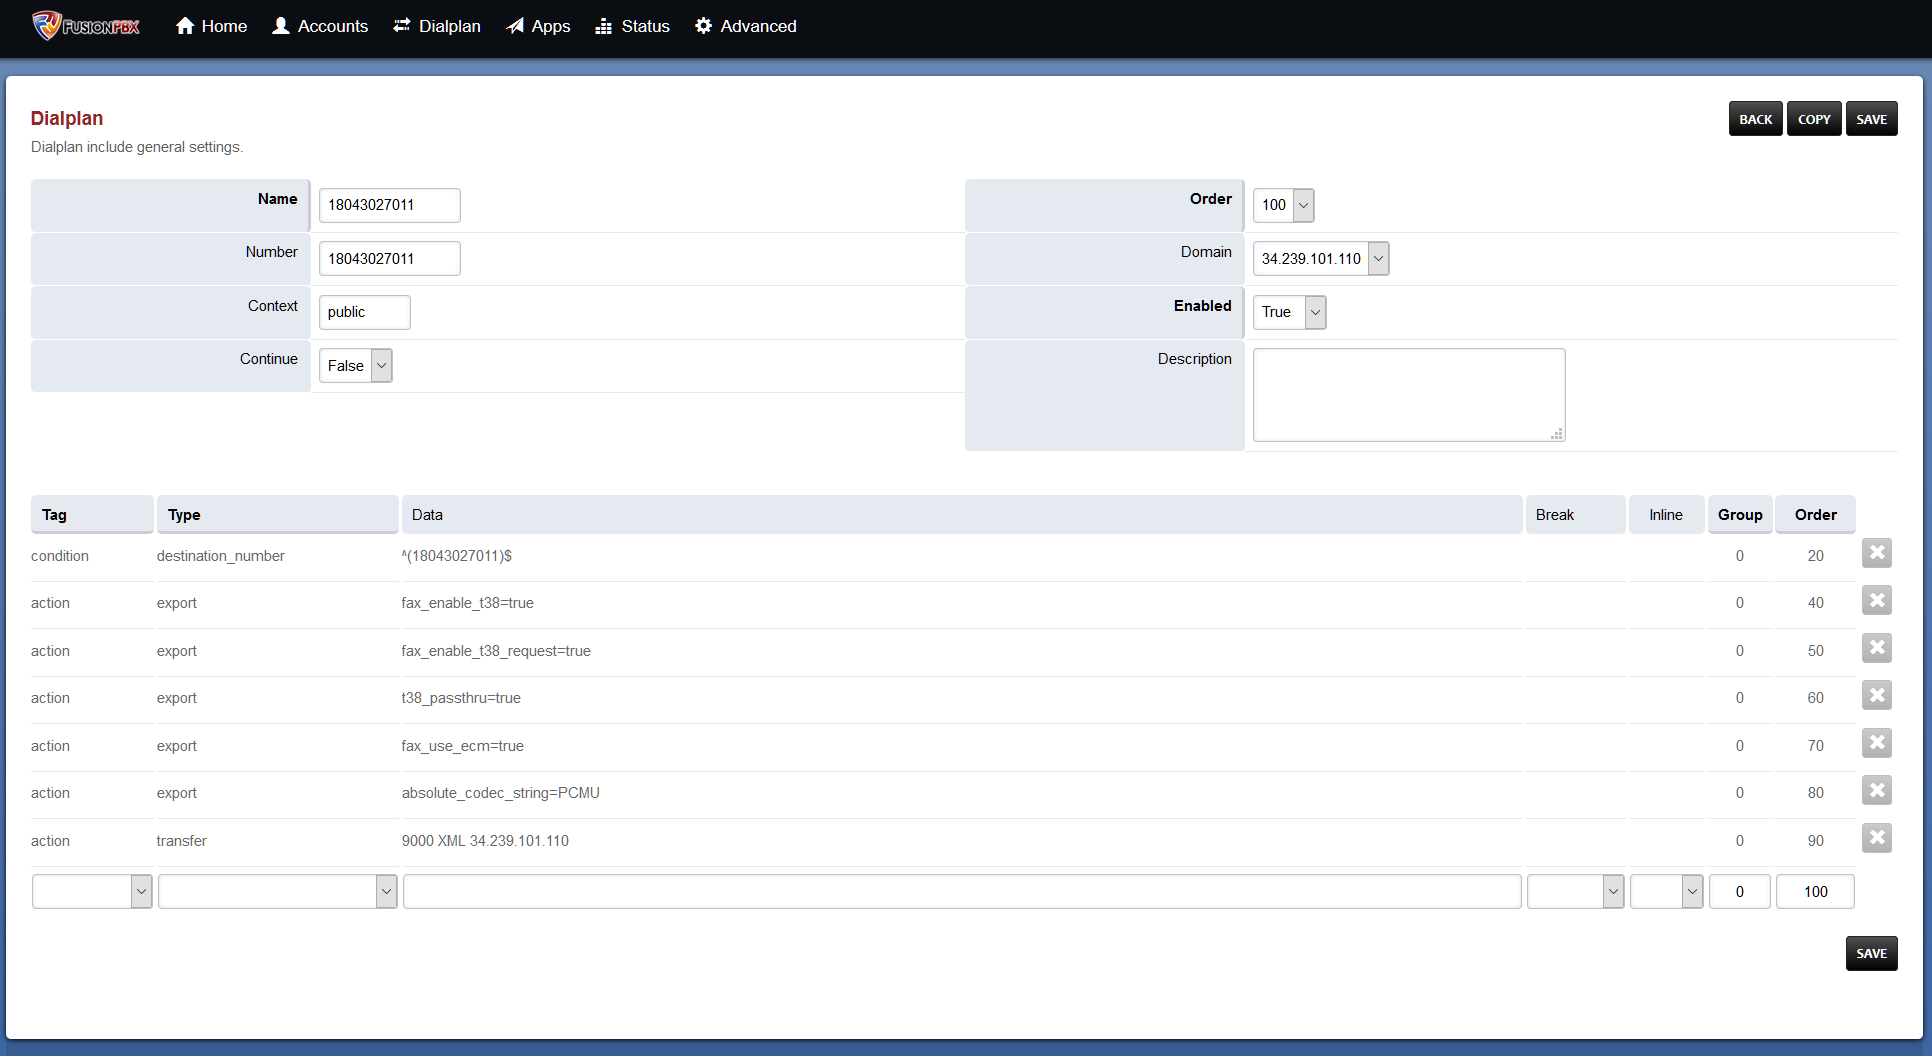
6. Next, we'll configure our "Outbound Routes" so that you can send calls out via your T38Fax.com trunk. Using the top menu, navigate to "Dialplan -> Outbound Routes" and click the "+" symbol to create a new Outbound Route.
Configure the following settings when creating your Outbound Routes:
Configuration Option Required Value Gateway : Select "T38Fax" Dialplan Expression : Select "10 Digit" & "11 Digit" dialing 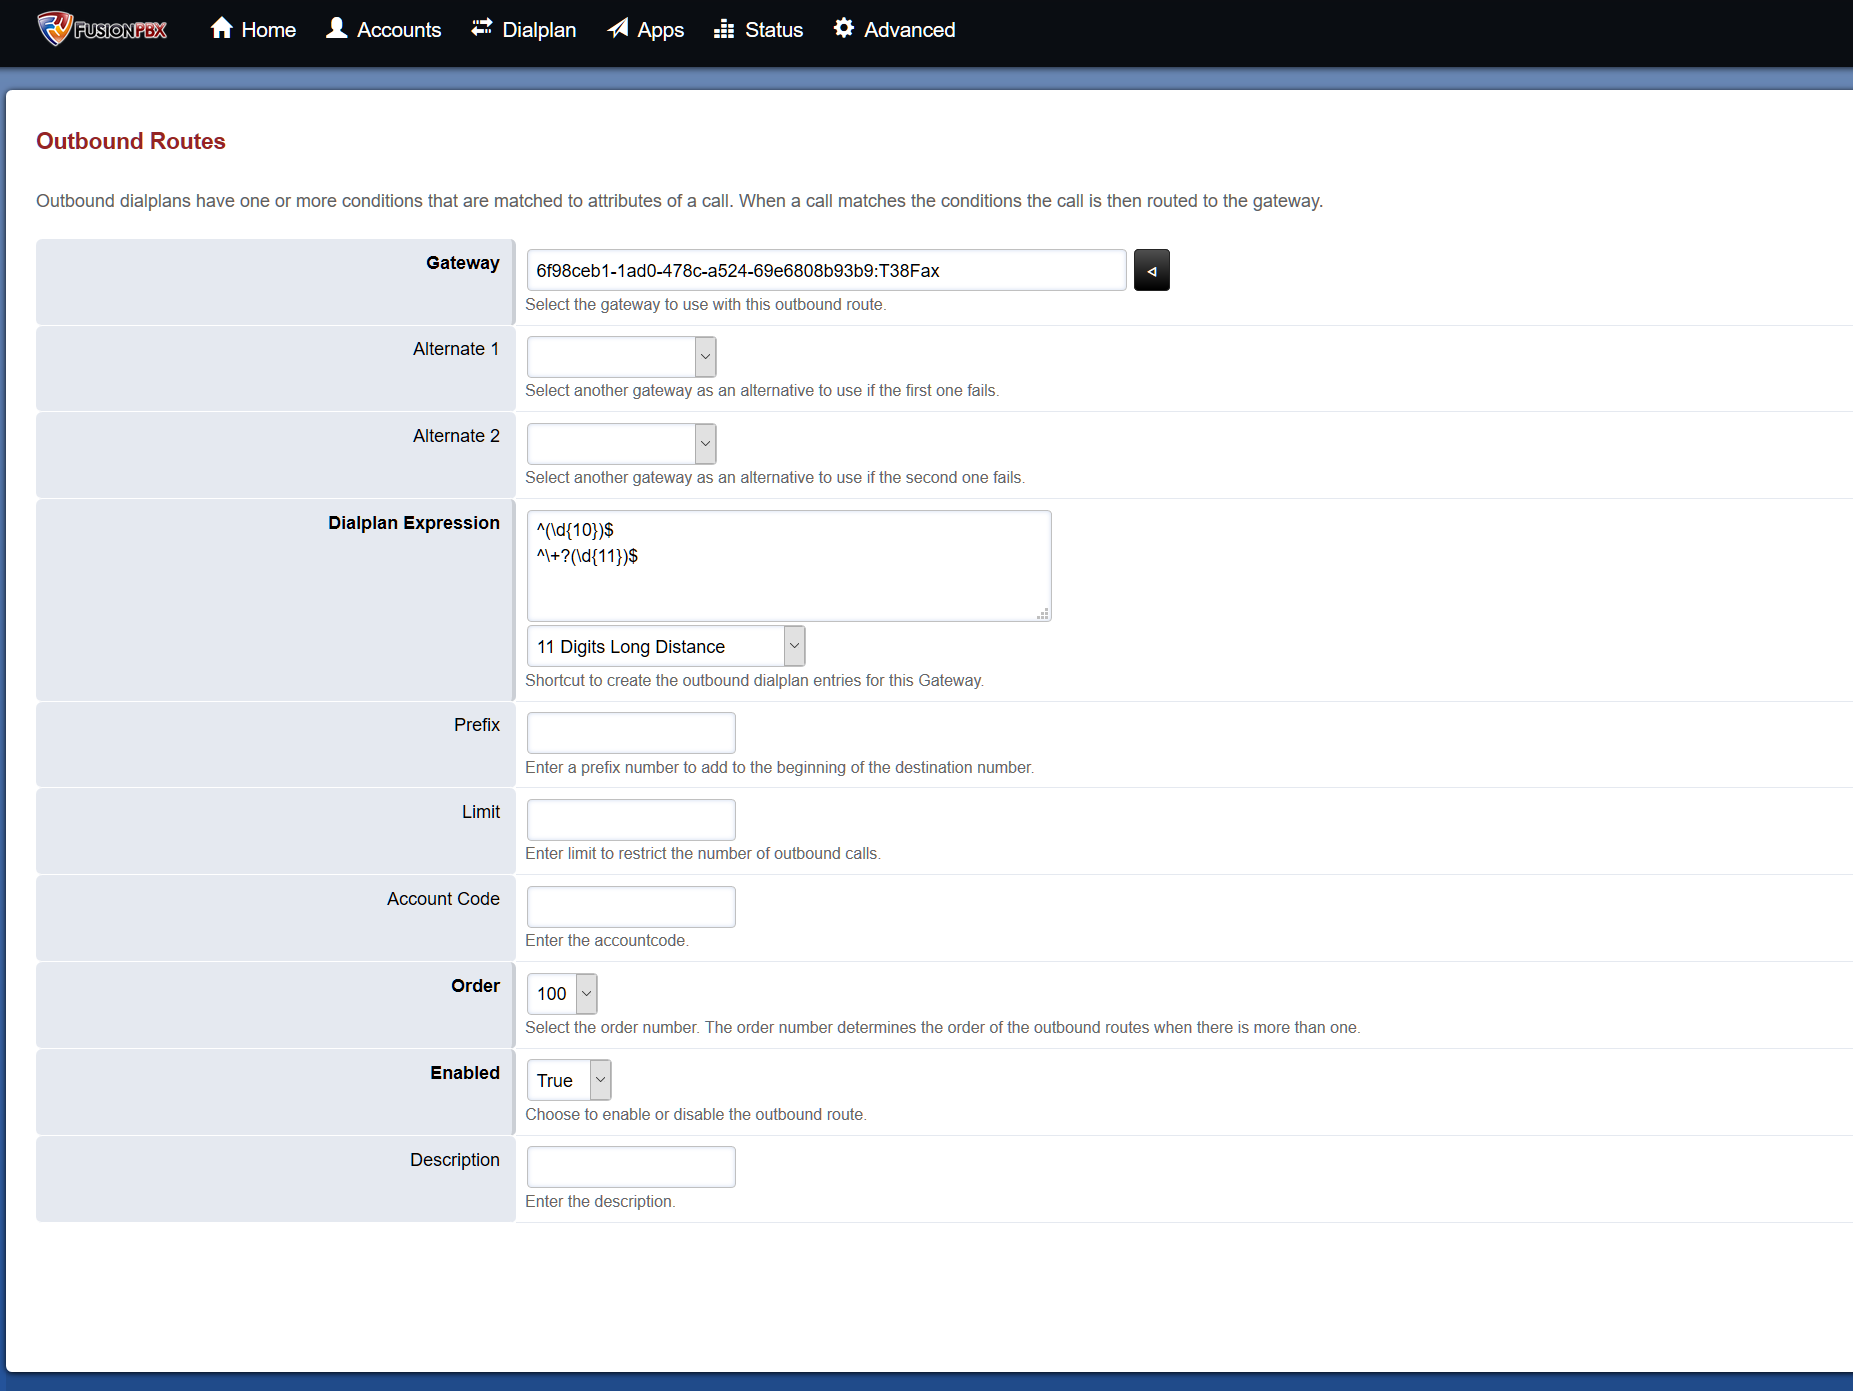
FusionPBX Outbound Routes Wizard - T38Fax.com Optionally, you can simply copy & paste the following into the "Dialplan Expression" field:
^(\d{10})$
^\+?(\d{11})$
7. We need to make some final adjustments to the outbound route diaplan(s) to ensure that ECM is enabled for Outbound calls from the fax server.
Navigate to "Dialplan -> Outbound Routes" and add the following definitions for each Outbound Route you created in the previous step:
Add/Edit the following definitions to each Outbound Route:
Tag Type Data Condition ${toll_allow} ^(t38fax)$ Action Bridge {fax_use_ecm=on}sofia/gateway/GW/$1 
FusionPBX Outbound Routes Wizard - T38Fax.com 8. We'll need to make a small adjustment to the XML configuration file for spandsp to ensure that ECM is utilized. Navigate to "Advanced -> XML Editor" and open the /autoload_configs/spandsp.conf.xml file. Change the "use-ecm" parameter to "True" your fax settings should look like this:
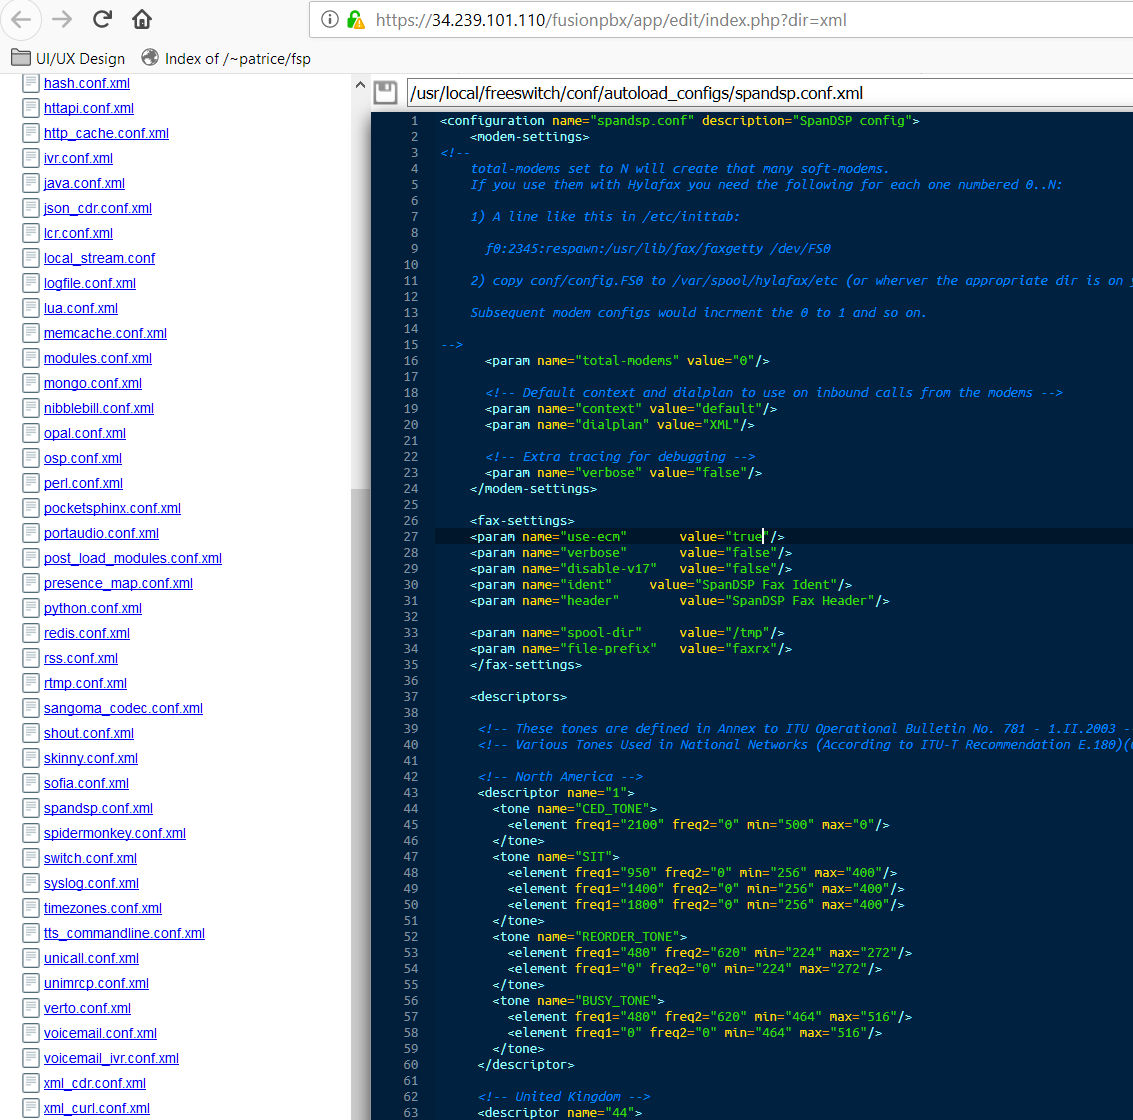
Be sure to "Save" your XML config file by clicking the Floppy Disk icon in the upper left of the editor's window
9. Switch back to the FusionPBX GUI (close the XML Editor) and make the following adjustment under "Default Settings" to enable T.38 reINVITE requests:
Configuration Option Required Value fax_enable_t38_request : true 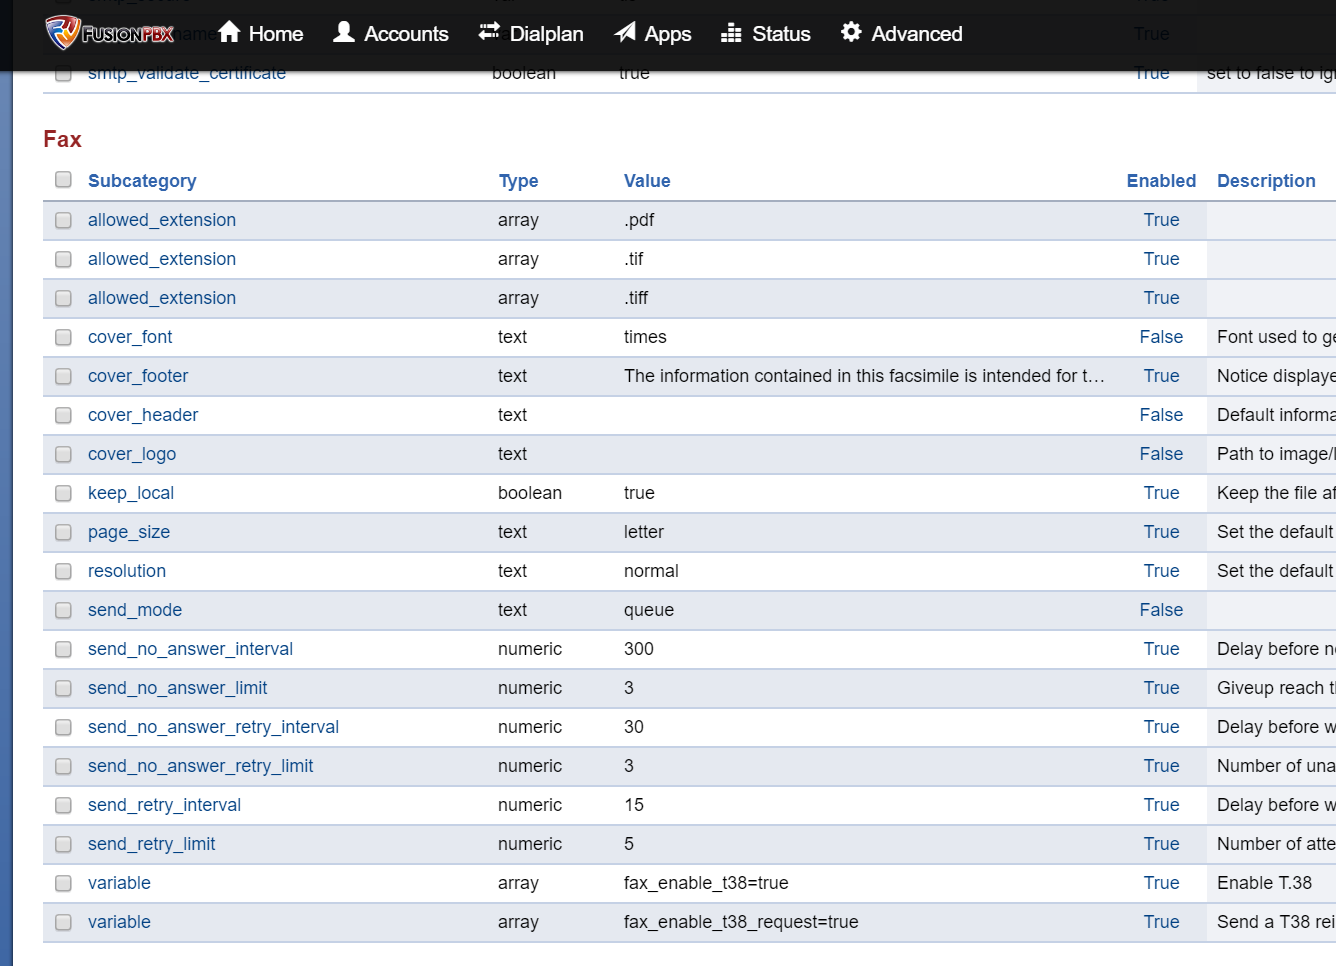
10. From the linux command line of the system where FusionPBX is installed, you'll need to install the following in order to convert PDF to TIFF files and other associated tasks.
# Run as root:
yum -y install libtiff-devel ghostscript libjpeg
Be sure to reload mod_spandsp from fs_cli:
fs_cli -x "reload mod_spandsp"At this time, you should be able to successfully send a fax using T.38 Passthrough to your ATA. Feel free to test by sending a single page fax to: 215-825-8792, and the system will fax your transmission back to you once it's successfully received it.
- T.38 Passthrough:
Why 5080? Learn More
Enter your SIP Username here. (This should be a DID assigned to your account that is available for registration. IE: 18043027000)
Still Confused? Learn More!
Enter the SIP Password for the SIP Username you entered above.
Still Confused? Learn More!
